
My stock (2011 Giant Anthem X 29er 3) DU bushing in my Fox Float RP2 Boostvalve lasted 2.5 seasons which isn't too bad I guess. I've heard of serious all-mountain riders blowing through one or two DU bushings in a season with all that rock bashing and riding drops they do.
I'd say about 70% of my riding over the past two seasons has consisted of trails that have a lot of granite rock with a fair amount of pushing my suspension parts through full range. I'm a cross country racer with bit of an indulgence for mild all-mountain style riding.


Two pics from the Fox website: Top, typical DU bushing set up, bottom; the new fox low friction bushings (now standard).

The Enduro needle bearing has needle bearings within a DU bushing sleeve with robust seals on either side:

I purchased the Real World Cycling bearing press tools to make the job easy. You can use a bench vice and match up the appropriate socket sizes from your socket wrench set as well, but the Real World Cycling tools are only $35.00 and you have them forever. When your friends see your cool new needle bearings they can borrow your press tool to do theirs.

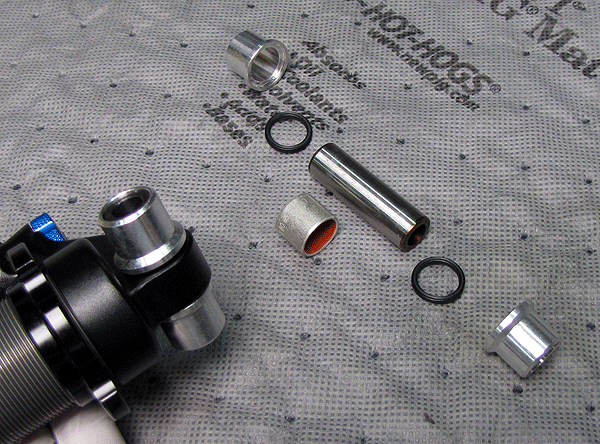
A trip to the hardware store and spending $2.00 bought me my DIY high-tech bearing press made from a 6 inch bolt, washers, and nuts. In the pic below I'm using the blue pilot tool to push out the old DU bushing. It took a bit of turning force to crack it and pushed out easy after that.

Here's the removed DU bushing pressed out and captured by the tool.

A quick clean of the shock eye.

Loading the Enduro needle bearing onto the needle bearing pilot tool which ensures perfect alignment.

The green tool is idiot proof with clear instructions for which end goes where..

Needle bearing installed

Putting in the other bits.. Mine came with three different sizes of sleeves to account for normal variances found. The "++" size (recommended place to start) fit perfectly with no binding or knocking, and smooth rotation.

One more sleeve..

Ready to put the seals on

Double sided seals seem pretty well built. Lightly grease before sliding on. Seals come in different colours to match or clash however you like. I like matching.

Use a torque wrench and tighten to factory spec.
For my 2011 Anthem X 29er the spec is 8.8 - 10.7 Nm for the upper shock mount

My old bushing was toast and had developed a knock that was easily produced by lifting the bike by the seat. No knock after Enduro needle bearing install.
I decided on the Enduro needle bearing after reading a lot of reviews. Many people report better small bump compliance and a need to increase shock air pressure due to more easily flowing through shock travel.
I haven't ridden the rocks yet. I've done one ride on mostly hard pack single track with lots of bumpy roots in some sections. My shock appears to be traveling through the same range it usually does on this trail, but I did notice an edge taken off small bumps. Right away I noticed greatly reduced friction when loading the suspension by pressing down on the seat, cycling the shock. The first tiny bit of travel before hitting where your sag is set moves very freely and it's very easy to feel the change in shock resistance between the top of the stroke and where the sag setting activates the shock.
Apparently the new low friction bushings from Fox are also very slick and supposed to last a long time. I don't know which system will be better. Probably can't go wrong with either one.
I decided on the needle bearing because it looks like it can take more punishment. I'll ride the Enduro bearing for the rest of this season then try the Fox low friction bushing next season. I'll post my comparison findings here.
With my early findings I can recommend the Enduro needle bearing. It does what it claims to do; increases small bump compliance, I didn't notice an earth shattering difference and so far haven't needed to increase my shock air pressure to compensate. That might change once I challenge the shock more on the rocks.
With the Real World Cycling bearing tools the re & re procedure was drop dead easy and fast. I didn't have to remove the shock from my bike. Less than 10 minutes. Could probably do it in 5 minutes now that I've done it once.
No comments:
Post a Comment